Image Compression with ShortPixel is important for any site owner. Web pages with images that are smaller in size load faster, spend less hosting resources and rank higher in search engines.
Table of Contents
Compress Your Site’s Images with ShortPixel
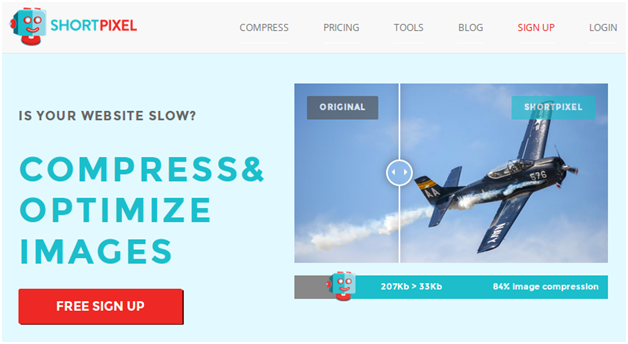
This is what you should always focus on if you want to get more visitors and keep the visitors that you already have. It’s no wonder that image compression is one of the best practices for running a website in 2018.
There are a few good cloud services that can help you accomplish this, and today we talk about one service that automatically compresses your site’s pictures: ShortPixel.
What is ShortPixel and how does it work?
Image Compression with ShortPixel is an image optimization service that works in the cloud. This means that your images are copied on its servers, where they are compressed using different algorithms and then added back to your site. There are different tools that help users connect their tools to ShortPixel’s servers.
The most popular is the ShortPixel plugin for WordPress, which has more than 90,000 active installations. You can also find a Website Optimizer for sites built in PHP, or a command-line tool and PHP libraries for more advanced users.
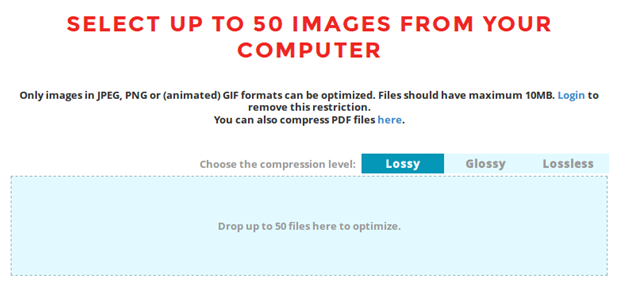
The easiest way to test how ShortPixel compresses images is to drop a few images into the online compressor.
It’s free and it’s powered by the same algorithms as the above image optimization tools. Please note that there are a few minor limitations for the free users – like the 10MB max size and the inability to download all optimized images at once.
What is image compression?
Any simple image you see on a display is information. Image Compression with ShortPixel is achieved by algorithms that reduce and rearrange that information in such a manner that the picture quality of the resulted image is, in most cases, similar to the original. You could say that image optimization is information optimization.
You can compress images using desktop software like Photoshop or IrfanView and upload the compressed pictures to your site. But this operation is time-consuming and if your Content Management System generates thumbnails when you upload an image, then these thumbnails will not be compressed. A solution is to use an automated tool for this task.
Image optimization methods: Lossless, Lossy, Glossy (ShortPixel)
There are two main ways to compress your images: lossless and lossy. As their names imply, the former doesn’t take any pixel away from your image, and the latter cuts the number of pixels.
Many people are not aware that their images could store not only visual information but also details like the time and place where the image was shoot, which camera was used, and with which settings. Lossless compression removes all this meta information from an image, keeping the same picture quality as the original.
On the other hand, lossy is a more dramatic compression: it reduces a lot of the image’s visual information. The processed files are noticeably smaller, you can expect even a 70-90% weight improvement. However, this doesn’t necessarily mean that the images will be of poor quality.
On contrary, online image compressors are tested on thousands of images, and the final images will look (almost) identical to the original to the human eye.
The nice thing about ShortPixel is its Glossy optimization method. Built for photographers and other people interested in picture quality, it delivers the best balance between how an image looks and its size.
You can also test the Glossy method using ShortPixel’s free online image compressor. It uses the same smart algorithms that compress images on WordPress sites.
ShortPixel plugin for WordPress
WordPress counts for almost 30% of the sites in the world. Basically, almost one in three sites is powered by WordPress. Having an automated tool for image compression is essential. Fortunately, there are a few good image optimization plugins for WordPress that are safe and easy to install, being hosted at WordPress.org: ShortPixel, Ewww, Imagify, WP Smush.
Here is how you can install ShortPixel: Login to your WP dashboard, look for the Plugins section in the left menu, click on the Add New button and search for the plugin you want to install – in this case, ShortPixel Image Optimizer. Click Install and then Activate. The plugin is installed and all you need to make it work is an API key.
Like many services that work in the cloud, ShortPixel asks you to link your site with its servers through an API key.
It sounds more complicated than it is – go to the ShortPixel sign-up page and you will get your own key after you create a new account. Copy the API key and paste it in the plugin settings. After validating it, the ShortPixel plugin will be ready to compress your images.
Remember that each new account comes with 100 image optimization credits per month. If you have a big site you can consider a paid plan. Moreover, if you know that you have unused thumbnail sizes, you might consider excluding them from optimization (Plugin’ settings –Advanced tab).
10 Tips for using the ShortPixel plugin for WordPress
- Optimize on upload feature: one main advantage of using such a plugin is that it automatically compresses your new uploaded images and the thumbnails generated by WordPress. But if you want to switch this feature off, you can do it from the Advanced settings tab.
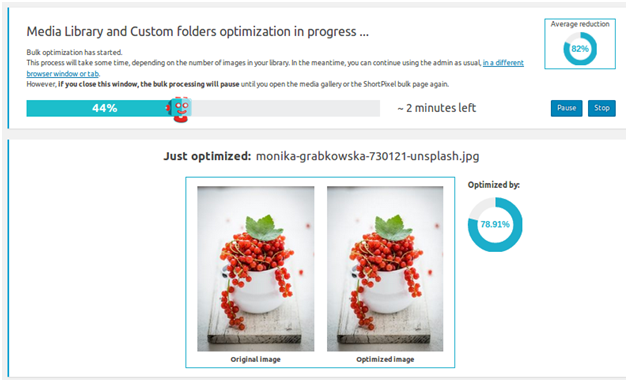
- Bulk compress your old images from the ShortPixel bulk page under Media Library. Just be sure that you have enough image optimization credits to finish the operation.
- You can optimize multiple images in the Media Library (List view) if you use the bulk actions dropdown menu.
- Before compressing your images, you could consider testing each optimization method (lossy, glossy, lossless). You can do this using the online compressor.
- The Image Backup option is checked by default. Your originals are stored in a backup folder and you can restore them anytime.
- Images that are not in Media Library: There are situations when the images are not stored in the Media Library. You can compress these images as well, by adding their folders to optimization from the plugin’s settings.
- WebP files: Free WebP versions for your images. WebP is an image format created by Google that produces smaller files. These images can be displayed only in the compatible browsers, like Chrome and Opera.
- Galleries and Sliders: ShortPixel works with all galleries and sliders.
- Resize images: you can resize the full images uploaded to WordPress.
- Free image optimization credits for non-profits: If you run a website for a non-profit organization, you could contact ShortPixel and ask for free image optimization credits.
ShortPixel Plans and Pricing
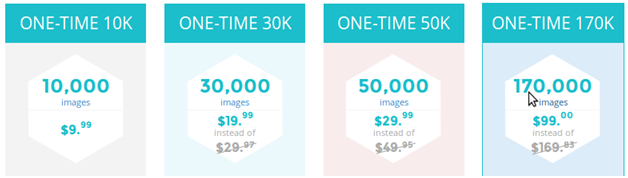
There are three types of plans: monthly, one-time and dedicated servers.
The subscription-based plans have credits that expire after 30 days if they are not used. If you choose a monthly subscription you’ll pay less per credit.
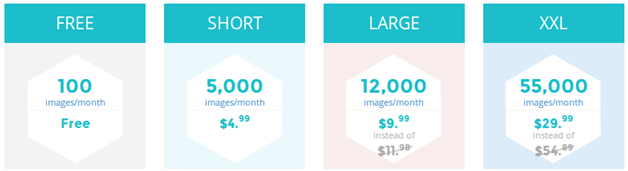
One-time credits don’t expire. These plans could be a better choice for those who don’t know their monthly optimization needs.
Dedicated servers are for big companies that need to compress more images on servers that are not shared with other users. These plans allow clients to resell image optimization or to include it in larger optimization packages.
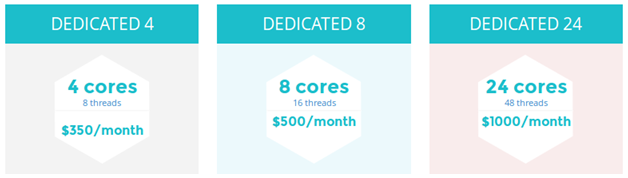
Image Compression with ShortPixel : Conclusion
Automated image optimization is helpful, and ShortPixel can be a solution for this. The only way to see if it suits your needs is to test it yourself.

- AI’s Impact on Personalization, Analytics, and Retention in Gaming - April 12, 2024
- The Marketer’s Marathon: Long-Distance Strategies for Sustained Traffic Growth - March 29, 2024
- What Is MagSafe for iPhone? A Quick Guide - March 18, 2024