All of today’s top tech devices are moving in the same direction: towards high definition graphics. Think of the retina displays that Apple has been rolling out with its iPads and iPhones, or how Android has been using displays with high DPI, x high DPI, or xx high DPI. Laptops and personal computers have 4k, 5k, and 8k monitors, and the list goes on.
Table of Contents
Way to Optimize HiDPI Images in Adobe Illustrator?
Essentially, the technology that displays graphics has been growing and upgrading exponentially. However, in matter of design this creates additional complications. How do we create graphics that are high quality, but are still able to be displayed across the variety of devices with their individual display settings?
Unfortunately, SVG graphics just won’t cut it in this situation. Instead, we have to learn how to optimize HiDPI images, which is pretty easily done with Adobe Illustrator.
Steps to Optimize HiDPI Images in Illustrator
In order to keep up with the growth and changes of displays on devices, it’s important to be comfortable with optimizing images in Illustrator. This can easily be accomplished with the Save for Web dialog box, but you have to make sure that you utilize Vectors as much as possible. Here’s an example of how to make it happen:
Step 1:
Press Shift > Option (or Alt) > Command (or Control) > the letter S.
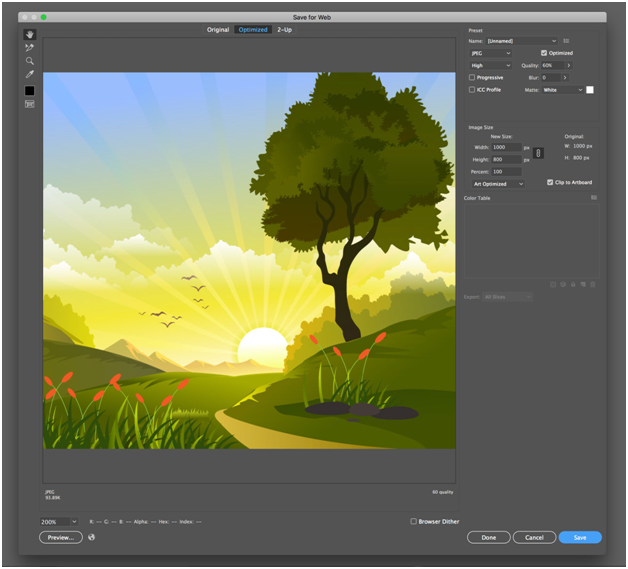
That should bring you to a dialog box that looks like this, below, and should have the artwork you selected from your Artboard right in the middle.
Step 2:
Go to the top right of the Save for Web dialog box to view your Presets. This is where you can work with the settings of the image in order to make it optimized. At the top of the presets (below the name) is a setting for what format your image should be in, set it to JPEG High. At the bottom of the Image Size box, you have an Optimized selection option.
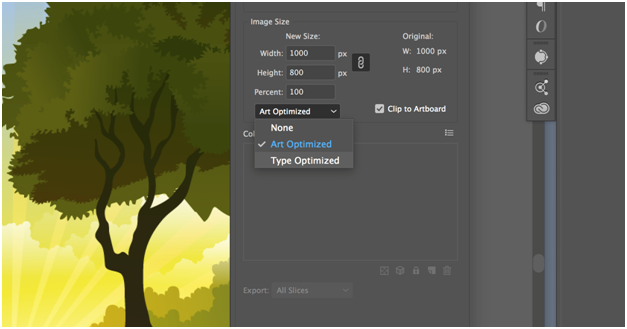
If you have text you want displayed in the image, you should set it to the choice of “Type Optimized.”
Step 3:
Now we are going to focus on the Image Size selections in the Save for Web Dialog box. The settings you chose here greatly depend on what device you’re expecting the graphic to be displayed on. For Apple products, like an iPhone or an iPad, you would need to set your Image Size settings to a “@2x” version of the file size. It’s pretty simple, just go to the “Percent” box, and instead of setting 100 percent, set it to 200%.
While there are also settings for graphics on an Android or a Windows operating system phone, this specific article will concentrate on scaling the image size up for iOS.
Step 4:
Next, press the Tab key. This will give you an accurate representation of the percentage you have set. The image is set to 200%, but you are viewing it at 100%. This will show you exactly what the image will show up as on a high resolution display.
If you’re using vector graphics, then you could size it up to 500% and it’s still going to look great on a high resolution display. However, it is important to keep in mind that any background photographs or images that are resolution dependent, scaling up the image is going to create some less than appealing results.
So, keep that in mind at the beginning when you’re using raster based graphics; choose an image that is large enough to handle your largest expected image size that you will be exporting. And that’s exactly why it’s important to have an idea of what device (and what operating system) your image is going on because that will help you determine the sizing you need for the graphics.
Step 5:
If your image looks good at the scaled up size, then it’s time to hit Save (located in the lower right hand corner of the Save for Web dialog box). When you’re saving your graphic it can be helpful (particularly if sending it to a developer) to send the original file size, and also mark the scaled up file size (for example, add “@2x” to the name, any developer would understand that) to send as well. That way the graphic can be distributed in both its original, and optimized/scaled up form. Then, hit save.

Step 6:
If you want to double-check the work, you can open up your graphic in an application like Photoshop. So, open Photoshop and go to File > Open. In the dialog box, select both versions of your graphic (the original, and the scaled up).
Now, you can compare the two of them. Both should have clean text, and no distortion in a background image. This will tell you whether or not your graphics should be good for exporting and sending out when it is going to be viewed on any sort of high resolution display. If you really want to check out how the look on a high-res screen, you can upload them to your web browser and select a device to view it (any smartphone or tablet, for example).
The Bottom Line
In order to properly optimize images for high resolution screens for devices such as smartphones or tablets, it’s important to make sure you image is sized and scaled to the appropriate settings. It can also be really beneficial to the process to check your graphics in applications such as Photoshop, or even take the extra step to check on the web browser of a high resolution screen.
Do you have any questions about optimizing HiDPI images in Adobe Illustrator? Please share your thoughts and comments below. Thank you!
Steps to Optimize HiDPI Images in Illustrator
- How to Optimizing HiDPI Images in Adobe Illustrator? - November 15, 2017

